Sunday, July 31, 2011

Craft Sale Results

Well I've had a very busy weekend, but I'm really happy with what I've accomplished so yay! It started with the craft sale yesterday, went to drawing the raffle this morning and entertaining some children this morning to spending some quality time with friends that it's been way too long between visits this afternoon.

The craft sale, just wouldn't have happened without some wonderful friends who just arrived without my even asking and helped clear the area and set it all up for the sale (massive thanks to Heather, Graeme & Catherine) and then Heather continued to spend the rest of the day in the kitchen doing all the refreshments with another friend Susie (who felt the need to bake some amazing scones), before all feeling the need to help clean up and put everything back at the end of the day - love your work guys - I owe you!

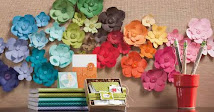
This is what the day looked like (yes I even forgot to take a camera so thanks again to a friend who took some via her phone for me!). Between the rain breaks we had lots of lovely people stop by and visit.


We were all safely snug indoors so we were fine. There were lots of bargain boxes to rummage through and many awesome bargains to be had!


This was one lovely lady (right) filling in her details after buying raffle tickets - thanks so much to Stampin' Up! for donating 90% of the raffle prizes such a great company that I'm very proud to be involved with as their charity work is fantastic - massive thanks to everyone who bought tickets - you're all wonderful. The raffle and refreshments mean that I will be able to donate the fantastic total to the Princess Margaret Hospital Foundation of:

$736.93

Thanks everyone! You're all fantastic and I truly appreciate all of your support. Now for the exciting bit......the raffle results were drawn this morning by people who had no vested interest in the outcome, witnessed by four independent adults - so starting with a bonus raffle prize which was donated by the ever generous Deb from Little Design Farm so congratulations to Natalie for winning this prize


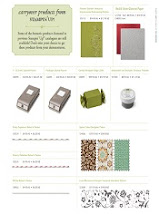
the fourth prize which was this awesome pack worth over $270 ....


was won by Annette who I think bought enough raffle tickets to almost buy the pack - thanks for your support, hope you enjoy your prize! Third prize was another awesome pack


won by Melissa - thanks for making such a great effort to support the cause. Second prize was a pack also worth over $270 was this one.....


and won by Heather - congratulations! The first prize pack valued at over $650 was won by a virgin stamper.............


who is open to being corrupted! Congratulations Belinda - I'm sure you are going to have a lot of fun with that pack! 

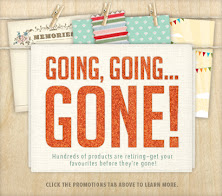
Thank you again to everyone who helped out on the day, came along as a seller, a buyer or just for moral support. Rumour has it I'll be organising another one for next year - thinking mid March - any thoughts as I'd appreciate all feedback on the day as there was lots of good bits, but also areas for improvement! Have a good weekend and I'll be back to regular blogging tomorrow with the Last Chance List - yes not long now until we get our new catalogue!!!!


Tuesday, July 26, 2011

PMH Raffle Tickets!

I'm currently in the middle of organising the craft sale (see sticky post above) for this Saturday and as part of the afternoon there will be refreshments on sale and a raffle to help raise funds for the Princess Margaret Hospital Foundation (our states children's hospital). There are always an infinite array of pieces of equipment and support programs at the hospital that are desperately in need of funds, as parents we hoped that this would help. 

Regarding the raffle I have checked with our states gaming laws and I am allowed to sell tickets for it up to 8 days prior to the drawing of it (you can read the appropriate document here), I have written permission from the PMH Foundation to raise funds for them and also from Stampin' Up! Australia who have donated the most massive box of goodies to raffle off......so that means that anyone in Australia can buy tickets and I will happily mail you the prize(s) if you win (overseas readers - I can't mail the parcel overseas, however if you have an Australian mailing address I am happy to send it there). So no excuses for those who have said they have prior commitments this weekend and can't come and say hi!!!!

Tickets are $2 each or 3 for $5 they are on sale from tonight until 8pm WST on Saturday 30th July. The raffle draw will be done on Sunday morning in front of independent witnesses and results will be put here on my blog and on the Facebook event for the sale here

How to purchase tickets:
1. Email me gerlach@iinet.net.au with your name, contact details and number of tickets you would like to purchase.
2. Make a deposit into the ANZ bank account BSB: 016016 Account: 476967137 under name Ann Gerlach. Please leave your SURNAME as reference for me.
3. You will receive a confirmation email from me with your ticket numbers for your reference.

Prize 1: Includes over $650 worth of Stampin' Up! product: including Alphabet chipboard, Simply Sent Kit, full pack Stampin' Spots, full pack Stampin' Write markers, two packs water colour crayons, Sticky Cuts, Chunky Glitter, DSP, brads, Pretties Kit, 3 rolls of ribbon, Floral Fusion kit, 3 ink pads, card stock and lots more!


Prize 2: Includes over $270 worth of Stampin' Up! product: including Simply Sent Kit, full pack Stampin' Spots, Stampin' Write markers, Sticky Cuts, buttons, DSP, ribbon, card stock and more!


Prize 3: Includes over $270 worth of Stampin' Up! product: including Simply Sent Kit, full pack Stampin' Spots, Stampin' Write markers, punch, die cuts, DSP, ribbon, card stock and more!


Prize 4: Includes over $270 worth of Stampin' Up! product: including Simply Scrappin' Kit, full pack Stampin' Spots, Stampin' Write markers, brads, Floral Fusion kit, DSP, ribbon, card stock and more!


Pretty awesome prizes aren't they - definitely worth a $2 ticket don't you think? Email me now to get yours and help raise funds for a very worthy charity.

Saturday, July 23, 2011

Monthly Swap - Monochrome

Our group had it's monthly meeting last night and part of the fun is participating in swaps. This month the swap theme was monochrome...........this was my contribution - a quick and simple multi layered card.


What you can't see from this photograph is how the centre of the medallion has been punched and layered up 3 times. I'll post the others gorgeous swaps soon......too much fun!

Stamps: Medallion & You're A Gem
Ink: Rich Razzleberry
Card Stock: Pink Pirouette & Rich Razzleberry
Accessories: Paper piercer, mat pack, scallop oval punch, large oval punch, XL scallop circle punch, 1" circle punch, 3/4" circle punch, Dimensionals, fire rhinestone brad, stamping sponge.

Friday, July 22, 2011

Loads of Friends

I have always loved the stamp set Loads of Love, it's cute, quirky and has heaps of different applications, I've used it for everything from wedding cards to birthday, moving house, thank you's it's one of those stamp sets that is just perennial and fun! I did a custom class this week with the directive of making cards that are gender neutral, not age specific or event specific until you add the greeting. This way you can have a stash of cards on hand and when you need one, you stamp a greeting, pop it on and within 2 minutes you have your card ready to go. Saves a lot of time and angst. For my sample cards I added a greeting and in this case decided to add a female driver, but for my stash I would leave off the greeting and person until I knew what event or person I was making it for.


Stuck for ideas or have a specific event or requirement for a card? Or just want to build up your card stash? Check my calendar of events to join in a class or if you have some friends who all want to make some cards together I will happily come to you and do a custom class, contact me now to organise a date.

Stamps: Loads of Love, Loads of Love Accessories & Circle Circus
Ink: Crumb Cake, Black Stazon, Real Red
Card Stock: Crumb Cake, Woodland Walk DSP, Real Red, Water colour paper, Whisper White
Accessories: 1/4" Real Red grosgrain ribbon, Scallop border punch, Dimensionals, 1 1/4" circle punch, stamping sponge

Thursday, July 21, 2011

Inkspiration Colour Challenge - Cupcake Voucher Holder

I combined a recent class sample with the Inkspirations colour challenge this week:


and here is the result:


I first made these a year or so ago here and did another one recently here which resulted in a few people expressing interest in learning how to make them - so we did a class and this was the sample I made up - I still have to add some Dazzling Diamonds glitter to finish off the icing, but was pleased with the result. They hold any normal sized gift voucher card or you can add a custom one.


The girls all had a ball making them, they also did a gift tag and card to match which I will show you in a separate post.

Card Stock: Very Vanilla, Rose Red, Pale Plum & Elegant Soiree DSP
Accessories: Boho Blossom punch, Bitty Punch pack, Crop-a-dile, Antique Brads, mini library clip, very vanilla grosgrain ribbon, circle scissors plus, paper piercer, Tombow glue.
Non SU!: Hot glue gun & glue sticks, Styrofoam ball, needle & thread.

Tuesday, July 19, 2011

Custom Colour Ink Pad - Baby Wipe Technique

Here is another idea of what to do with re-inkers other than just re-inking your ink pads that is! It is a fairly simple process of folding a baby wipe into thirds and placing it onto a styrofoam tray or plate or other non-porous surface. Add 2-3 drops in a couple of places on the baby wipe of 2-3 different coloured re-inkers. Don't add too much ink or too many colours or the whole lot will go muddy. I normally wait 5 minutes or so for the ink to spread and then just ink up your stamp and work as normal. Try not to move the stamp too much when inking it up as that will also make it go muddy. There is normally sufficient ink to make lots of stamped images from the one custom baby wipe ink pad so be prepared to make more than just one card - this technique is brilliant for mass producing cards for special occasions or Christmas cards when you need lots, but still want them to be individual and unique.


Want to come and learn some cool techniques using different Stampin' Up! items, check out my calendar of events for the next class (bleaching on August 16th) of course if there is any technique you would like to learn let me know as I'll be happy to incorporate it into my upcoming classes.

Stamps: Medallion, Word Play
Ink: Basic Black & Re-inkers: Daffodil Delight & Tangerine Tango
Card Stock: Pumpkin Pie, Whisper White, In Color DSP (hostess level 1)
Accessories: Fire Rhinestone brad, Daffodil Delight taffeta ribbon, Big Shot, Beautiful Wings Embosslet,  Tombow glue, Stamping Sponge, Paper piercer & Mat Pack.

Monday, July 18, 2011

Cupcake Handbags

Here's another idea for using the cupcake punch for a non-cupcake item - super simple, super fun - not my idea, but too cool not to share my version with you!


Stamps: Create A Cupcake
Ink: Concord Crush
Card Stock: Concord Crush, Peach Parfait, Pear Pizzazz, Whisper White, In Color DSP (hostess level 1)
Accessories: Build A Cupcake Punch, Basic Rhinestones, Dimensionals, Big Shot, Elegant Bouquet Textured Impressions Folder, 1" circle punch, Modern Label Punch, Word Window Punch, Tombow glue.

Sunday, July 17, 2011

Upcycled Aluminium Can Fridge Magnet

This was the fridge magnet we made to match the tea-light upcycled aluminium can, it uses the same Big Shot die and materials, but we added a bottle cap to the centre of it! A very good item for releasing stress and tension - get a bottle cap, place it bottom up and bash it with a rubber mallet. It flattens it into a perfect shape for holding 1" circle punched items.


Stamps: You're A Gem
Ink: Basic Black
Card Stock: Real Red
Accessories: Big Shot, Flower Folds Die, Polka Dot Textured Impressions Embossing Folder, 1" circle punch, Sticky Strip
Non SU!: aluminium can, Stanley knife, magnet, bottle top, rubber mallet

Saturday, July 16, 2011

Punched Happy Hippo

I made up several of these punch art hippo's (you can see another I made last year here) and then had one on hand to make a fast card for a birthday. I raided my 'scrap' box which contains lots of punched shapes or Big Shot die cut outs that have been cut as extras when I was cutting other things. I found lots of number 5's and glued them randomly onto a piece of Real Red card stock, put it through the Big Shot with the square lattice embossing folder (still available as a carry over item from the Summer mini catalogue). It's makes great inlaid embossing - such a cool background effect I use it a lot.


Nice and bright isn't it? I love bright colours for children's cards. What's your favourite colour for a child's card?

Stamps: Party Hearty
Ink: Basic Grey & Basic Black
Card Stock: Basic Grey, Daffodil Delight, Real Red, Pacific Point, Basic Black,
Accessories: Square Lattice Textured Impressions Embossing Folder, Timeless Type Junior Alphabet die, Big Shot, Tombow glue, Stamping Sponge, Dimensionals & lots of punches.

Friday, July 15, 2011

Peek-a-Boo Monkey Box

In May I participated in a number of challenges on a demonstrator website whilst others were at our annual Stampin' Up! national convention and one was to make a really cute little gift box called a peek-a-boo box, which at the time I did in pink and green and decorated with a water colour flower. I re-made mine recently to match the card I made last week.


How cute is this monkey??? I made the box to hold chocolates, but it could also be a gorgeous gift box for hair clips, jewellery or some other small treasure! 


Stamps: Fox and Friends, Eat Chocolate, Afterthoughts (level 1 hostess set)
Ink: Real Red, Chocolate Chip
Card Stock: Very Vanilla, Chocolate Chip, Real Red
Accessories: Stamping Sponges, paper snips, Dimensionals, Early Expresso 1/8" grosgrain ribbon, thin window sheet, corner rounder punch, 1 3/8" circle punch. 

Thursday, July 14, 2011

Catalogue Tag Card CASE

I love getting ideas from the catalogues that we get. This was CASEd from the Autumn-Winter mini catalogue and was originally made using the Strength and Hope stamp set, which I didn't have when I made this card, but I still like the layout!


Stamps: Vintage Vogue, All A Flutter
Ink: Melon Mambo, Baja Breeze
Card Stock: Baja Breeze, Very Vanilla, Melon Mambo
Accessories: Clear Rhinestones, Dimensionals, Mat Pack & Paper Piercer, paper snips, white taffeta, Crop-a-dile, Big Shot,  Vintage Wallpaper textured impressions embossing folder, Elegant Lines textured impressions embossing folder, polka dot textured impressions embossing folder, stamping sponges, hemp twine, spritzing tool.

Wednesday, July 13, 2011

Birthday Party Spider Treat Bags

One of the things in the new catalogue that I love is the mini lunch sacks. They were perfect for my son's birthday party treat bags recently (I try to minimise the amount of plastic in our lives) and these were a real hit and surprisingly quick to make! I cut the scallop edge off the top, ran them through the Big Shot with a Stampin' Up! embossing folder that we don't have available in Australia (yet), but that my friend from America sent me because she knew I loved spiders and have a boy. The bags were held shut with a mini bulldog clip (non SU! but you could easily use a library clip).


The spiders were made using simple punch art and lots of scraps of card stock. The eyes were made easy thanks to the Owl Punch.


The bags were big enough to fit in a metal die cast car, stickers, a gel pen, treats and a balloon, more than enough to keep a child busy on the way home from a party! These would make awesome party or in fact any special occasion wrapping - want to order some of the mini lunch sacks? Then contact me today or earn them for free by hosting a workshop party!

Card stock: Basic Black, Whisper White, Real Red
Accessories: Tombow Glue, Owl Punch, Scallop Circle punch, Photo Corners punch, Spider Web Textured Impressions Embossing Folder.

Monday, July 11, 2011

CPC1 Summer Solstice

I was fortunate enough to earn this stamp set, Summer Solstice, for FREE at the Australasian annual Stampin' Up! convention this year, it's one of the new ones that will be in our 2011-2012 Idea Book and Catalogue to be released on the 1st of September. When I saw the challenge to make a pretty card using the sketch on Craft Project Central I knew I wanted to use this set!


I stamped the butterflies directly onto the Marina Mist card stock, then again on the So Saffron, cut them and stuck them on top of the other ones to give more dimension to the card. The same for the flower, I stamped it twice onto the card stock, but one whole flower out, then cut the other into all the petals and flower centre, and stuck all the pieces back together using Dimensionals (you can see the white foam of the Dimensional on the photo below holding the flower centre up). I added the Crystal Effects to the flower centre and butterfly bodies to add another dimension to the card and the same for the paper piercing.


Stamps: Summer Solstice
Ink: Basic Black & Cherry Cobbler
Card stock: So Saffron, Cherry Cobbler, Marina Mist, Old Olive
Accessories: Scallop border punch, Crystal Effects, Stamp-a-ma-jig, paper piercer, mat pack, Dimensionals

Blogging

Over the last month I've been doing a course on how to build and maintain a better stamping blog via a pretty awesome site, they run a heap of different business stamping curses over the year and it's not just limited to any one company, so if you are interested check it out here. They have a 10 day trial for US$1 so you can see if it's for you or not. I've learnt a lot, but I think my main limiting factor at the moment is time! Ohh well at least I still squeeze in some stamping on the odd occasion................ 

Sunday, July 10, 2011

Motorbike & Extreme Guitar JAI Colour Challenge

Just Add Ink (JAI) had a cool colour challenge this week and I made two quick cards for it. I have been known to spend +4 hours on one card, so I am trying to practise making cards that take me under 10 minutes otherwise I'll never get cards made to send to people! The colours were:

which screamed masculine to me - but check out the other entries as they are far from masculine! The first I made was using a cool stamp from the current mini catalogue called simply Motorbike....


The second was done using the same layout and additional stamp sets, but featuring the single stamp Extreme Guitar.


Stamps: Motorbike, Extreme Guitar, Extreme Elements, Word Play
Ink: Basic Black, Cherry Cobbler & Soft Suede
Card Stock: Very Vanilla, Cherry Cobbler, Soft Suede
Accessories: Stamping Sponges, Basic Rhinestones, Decorative Label punch, Dimensionals, Aquapainter & water colour crayons.

Saturday, July 9, 2011

Floating Re-Inker Flowers

Growing Green is such a nice stamp set, I like the delicate leaves on the fern and the flowers. The flowers are perfect for the floating re-inker technique as they have nice open spaces within the petal outlines. 


The technique is when you use white embossing powder to heat emboss the image outline onto shimmer white card stock (it needs to be a non-porous surface). Spritz the back of the card stock once (this stops it from bending) and then several times on the front until the water pools. With the tip of an Aquapainter apply a small amount of re-inker to the edge of the petals and watch it spread and move (if it goes over the edge of the embossed image don't worry), repeat with up to three different colours, the different colours will blend and move on the surface of the water. Set it aside to dry. Once dry you can  cut out the flowers and use them on your projects.

Want to learn some cool techniques like this? Check out my class schedule as once a month I have a technique class or can do them to suit if you have at least 4 people who want to do a class.

Stamps: Growing Green, You're A Gem
Ink: Rich Razzleberry, Regal Rose, Concord Crush
Card Stock: Shimmer White, Whisper White, Concord Crush, Newsprint DSP, Old Olive
Accessories: Big Shot, Little Leaves Die, Circle Scissors Plus, Rich Razzleberry Polka Dot grosgrain ribbon (retired, but you can still get plain), Heat Tool, White Embossing Powder, stamping sponges, Aquapainter, Dimensionals.

Friday, July 8, 2011

Chocolate Monkey

Here's a fun card we made at a recent workshop for the free make and take. It uses the technique of putting a flat scallop border around a shape like here. The circle and the chocolate truffle are popped up on Dimensionals to give the card more depth.


Want to get some friends together for a fun couple of hours? Learn some new papercrafting techniques and as hostess earn some terrific free stuff.......if you want to book a workshop, contact me to book one today.

Stamps: Eat Chocolate, Fox & Friends
Ink: Chocolate Chip, Real Red
Card Stock: Very Vanilla, Crumb Cake, Real Red, Chocolate Chip
Accessories: Big Shot, Circles #2 Die, Scallop border punch, Real Red grosgrain ribbon, Dimensionals.

Thursday, July 7, 2011

Spinning Snail

The final card we made in the Bugs and Kisses class this week was a spinner card, these are always lots of fun both to make and receive.


So what stamp set would you like to see me use for the next card class?? We're making one of these spinning cards as a free make and take at a Last Chance Workshop in August - let me know if you want to come along and join in the fun!

Stamps: Bugs & Kisses, Inspired By Nature
Ink: Crumb Cake, Chocolate Chip, Real Red, Basic Black & Old Olive.
Card Stock: Very Vanilla, Old Olive
Accessories: Stamping Sponges, Dimensionals, Word Window Punch, paper snips, 

Wednesday, July 6, 2011

Stack of Bugs

This is a super cute stack of bugs that could be used for any occasion and was the second in the card class I taught this week. I wanted to show two simple, but effective techniques in one card - the faux bow and scallop trim behind the oval.


The faux bow is actually two lengths of ribbon, one wrapped around the card and the other looped


Then and held into the bow shape with a circle fire rhinestone - back.


With thinner ribbon I would put the brad over the flat piece of ribbon as well, crimping it like a traditionally tied ribbon,  and through to the back of the card. However with the width of this ribbon, I merely adhered the bow to the top of the flat ribbon as it is too bulky to do the other way.


The scallop trim behind the white oval is the flat scallop trim border, snipped at regular intervals


Then stuck onto the back of the oval to frame it, on the Bugs Stack card we used Pear Pizzazz, but for these photos I just grabbed some scrap which happened to be Real Red.


Like to learn nifty techniques, come join us for some fun during our classes, we techniques like these in regular classes not just during the technique classes. Come back tomorrow to see the final card we made in the class.

Stamps: Bugs and Kisses
Ink: Pumpkin Pie, Daffodil Delight, Pear Pizzazz
Card Stock: Whisper White, Pear Pizzazz, Pumpkin Pie
Accessories: Pumpkin Pie Striped Grosgrain Ribbon, Big Shot, Oval Die, Square Scallop Die (carried over from Summer mini), Dimensionals, Corner Rounder, Scallop border punch, Elegant Lines Textured Impressions Embossing Folder, Stamp-a-ma-jig. 

Tuesday, July 5, 2011

Hungry Caterpillar ....Or Rather Worm!

Our son loves  the book The Hungry Caterpillar and I have lost count how many times we have read it to him over the years, now he counts along with us and can recognise and spell out words - who knows soon he may be reading it to us! So when for this weeks card class I was asked to base it around the stamp set Bugs and Kisses, I knew that I would have to include this type of card......inspired by one I had seen created by the ever talented Andrea Walford here and here. The first card from the class uses a lot of circles cut via the Circle Scissors Plus and the Big Shot, both of which are such cool tools! Here's the front of the card.......


Doesn't the sponging add such great dimension to the apple? Here's the back of the card.........


Of course we can't forget the inside of the card........looks just like the apple was sliced in half doesn't it! I love the sentiments in the Bugs & Kisses stamp set!


If you want to join us for future classes, check out my calendar of events here or email me and I'll add you to my newsletter list where all my classes are listed 2 months in advance.

Stamps: Bugs and Kisses
Ink: Bravo Burgundy, Old Olive, More Mustard & Chocolate Chip
Card Stock: Very Vanilla, Old Olive, Real Red, Chocolate Chip, Basic Black
Accessories: 1 1/4" circle punch, 3/4" circle punch, paper snips, stamping sponges, Circle Scissors Plus, Big Shot, Tombow Multi-Purpose Adhesive, Boho Blossom punch, Round Tab Punch, Full Heart Punch.

Monday, July 4, 2011

Sweet Stitches Designer Paper

There are so many nice things in the Autumn-Winter mini catalogue, it gets hard to decide which to use first sometimes, this card incorporates several items and as a bonus is not only very bright and happy, but really quick to make and showcase the gorgeous double sided Designer Series Paper from Stampin' Up!


Stamps: You're A Gem
Ink: Tempting Turquoise
Card Stock: Whisper White, Daffodil Delight, Tempting Turquoise, Tangerine Tango, Sweet Stitches DSP
Accessories: Dimensionals, small oval, large oval, Tangerine Tango Pom Pom Trim. 

Sunday, July 3, 2011

Blast Off!

A fun fast birthday card using some simple water colouring techniques with the Aqua Painter. I love having some fast card techniques up my sleeve for when you get only very short notice of an event! I also really like how with this stamp set it is so easy to separate the greeting from the image, making it easy to move elements around or mix and match!


Stamps: Pun Fun
Ink: Real Red, Pacific Point, Daffodil Delight, Basic Gray
Card Stock: Pacific Point, Real Red, Whisper White, Water Colour paper, Celebrations DSP
Accessories: Extra Large scallop circle punch, 1 3/4" circle punch, Dimensionals, Word Window punch, Modern Label punch, stamping sponges,  Aquapainter

Saturday, July 2, 2011

Moving Motorbike

Creating movement on a flat surface can be a challenge, often it can be done with colour, hightlights or layers and Dimensionals. You can also create it by stamping off, that is ink up your stamp, stamp once, then re-stamp without re-inking to get a fainter image. Most stamps when inked can be stamped off three to four times and still produce a complete image. When stamped off in series it can create the illusion of movement.


Pretty cool effect isn't it? What other images do you think would work well with this technique??

Stamps: Motorbike, You're A Gem
Ink: Basic Black
Card Stock: Baja Breeze, Cherry Cobbler, Love Letter DSP, Very Vanilla, Basic Black
Accessories: Word Window punch, Modern Label punch, Stamp-a-ma-jig, Big Shot, Square Lattice die (carry over from summer mini catalogue), Dimensionals.

Friday, July 1, 2011

July Purchase Bonus


From the 1st - 31st of July for every $100 order (not including postage) you can earn a FREE bundle with a RRP of $31.95! The bundle consists of 13.7m of 1/4" wide white grosgrain ribbon with a repeating flower design and 48 flower shaped buttons, 16 each of 3 colours approximately 1.3cm in diameter (Daffodil Delight, Melon Mambo & Pacific Point).


So if you want some terrific accessories for FREE, put your order with me during July to take advantage of this awesome offer!