Friday, February 25, 2011

RSPCA Fundraiser April 2nd 2011

After all of the natural disasters that have happened of late across Australia and New Zealand it's been a bit overwhelming knowing which charities to support, as I just want to help them all, as no one is less deserving than the other. However I have chosen just one as the focus of my Stampin' Up! Autumn-Winter Mini Catalogue Launch on April 2nd. I was reading the news on the web about how the RSPCA in Queensland had completely lost it's headquarters, 4 of it's other centres had been seriously damaged and that was just after the floods - since then they have had a category 5 cyclone affect 75% of the state and more subsequent flooding. So why the RSPCA, well they get very little government support (less than 2%), weren't eligible for flood relief funds and in general at times like this their services are in desperate need, but they aren't being given the support to nable them to continue their work without some serious help.

If I could work out how to link a PDF document to this blog you could download the information on the fundraiser - but as it is I have no idea how to do that, so if you are interested in coming along to a fun afternoon, using all new stamp sets and accessories from the new mini catalogue, making 5 great projects and having some fun, ping me an email and I will send you the details!


Sesame Street on Film

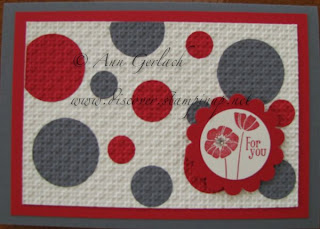
How versatile is the scallop circle punch - I love it for the variety of flowers you can make with it, but also for punching out all of the co-ordinating stamps e.g. Circle Circus, Punched Posies, Punch Bunch (which you can earn for free during Sale-a-bration) and many more. For a variation on punched flowers though this is a quick fun card that appeals to all ages and is just too cute!


Stamps: So Happy For You
Ink: Basic Black & Chocolate Chip marker pen
Card Stock: Old Olive, Pacific Point, Basic Black, Whisper White, Real Red, Pumpkin Pie, Daffodil Yellow, Crumb Cake.
Accessories: Scallop circle punch, 1/4" circle punch, 1" circle punch, small oval punch, spiral border punch, Two Step Owl Punch (eyes), paper snips, SNAIL, Tombow glue.

Tuesday, February 22, 2011

Barrel of Monkeys

I think if you were a child of the 60-70's you grew up knowing what the game Barrel of Monkeys was - whilst shopping a while back I was amused to see that amidst all of the techno toy gadgets available these days, you can still purchase the good old Barrel of Monkeys! So here's my take on it........


The wooden planks of the barrel were hand drawn and the binding rings were another piece of card stock. The final card had a sentiment stamped in Chocolate Chip on the bottom left corner of the card. The leaves are from the two step bird punch and some were raised up on Dimensionals so as to give a more realistic effect and the top monkey was popped up as well and from the close up below, you can see how I hooked his tail over the leaves. 


Stamps: Fox & Friends
Ink: Old Olive, Chocolate Chip.
Card Stock: Old Olive, Certainly Celery, Whisper White, Early Expresso
Accessories: Paper snips, Dimensionals, Two Step Bird Punch, XL oval punch, Two-way glue pen, Stampin' Sponge.

Monday, February 21, 2011

Inlaid Embossing Thanks

This was the first card I did with the inlaid embossing technique, but the others got blogged first here.  It's a super easy, yet stunningly effective technique. I made these as thank you's to go with orders from a workshop. I always make either a card or small 3D item as a thank you for all orders.


Stamps: So Happy For You
Ink: Concord Crush
Card Stock: Pear Pizzazz, Concord Crush, Peach Parfait, Poppy Parade, Whisper White
Accessories: Scallop border punch, 1 3/8" circle punch, 1" circle punch, 3/4" circle punch, Big Shot, Square lattice embossing folder, Word window punch, modern label punch, Dimensionals, Daffodil Delight taffeta ribbon.

Sunday, February 20, 2011

Long Fellows

A while ago I did a workshop on using up scraps - these cards were inspired to use up scraps of card stock that accumulate when I just trim down a piece to layer it up & I have lots! 


I keep them in colour families or in this case, they were all the new in colours with Daffodil Delight so I knew they would match perfectly. The hostess level 2 set Long Fellows worked really well for this design and I stamped them in basic black onto vellum, coloured the image with markers, tore the vellum and sponged the edges and layered it on top of the card strips, holding the vellum in place with brads. They were just built up on a Whisper White Card base, but you could always layer the white up onto a different colour card base e.g. one of the In Colours to make it "pop" more, I preferred the simplicity of this though.


Stamps: Long Fellows (hostess level 2)
Ink: Basic Black, Pear Pizzazz & Peach Parfait; markers in Old Olive, Pear Pizzazz & Peach Parfait
Card Stock: Vellum, Whisper White, Concord Crush, Peach Parfait, Daffodil Yellow, Pear Pizzazz & Poppy Parade.
Accessories: Paper piercer, Mat Pack, Sponges, paper snips, SNAIL, Tombow 2-way glue, gold brads.

Thursday, February 17, 2011

Sweetheart Gift Card Holders

I recently made some gift card holders suitable for movie tickets for my son's daycare girls as a little thank you. I used the Sweetheart stamp set in different colours and these were the result:


They fold over in a wallet type fold, so they are a standard card width (14.8cm) but are only 9cm high as there is a 1.5cm overlap. The wallets are held shut with a belly band embellished with the sentiment.


I used the stamp positioner to get the leaves and stem to match up in place with the heart. The centre of the heart I texture embossed with the square lattice folder and added with dimensionals. The little flower is a Bitty button backed with the same shape punched out and all glued together with Crystal Effects.


Stamps: Sweetheart
Ink: Basic Black, Old Olive, Daffodil Delight, Pacific Point & Real Red
Card stock: Bashful Blue, Old Olive, Daffodil Delight, Pacific Point, Whisper White & Real Red
Accessories: Big Shot, Lattice embossing folder, Full heart punch, Bitty buttons, Punch Pack, SNAIL, paper snips, Dimensionals, stamp-a-ma-jig.


Tuesday, February 15, 2011

Back to School Scrapbook Pages

Yay school finally went back after the long hot summer holidays! To celebrate we made school themed pages at this month's scrapbook class - I'm a year behind in doing my pages, but of course you could change the year and make it current! The first page was this one - how cute is that pencil? The background letters were just randomly stamped in Versamark to make it more interesting.


The Pacific Point photo mat had a pull out journaling tab behind it on the A+ tab, but could go landscape or portrait orientation on the page to suit the photos.


The second page was designed to fit the large school class photograph (it does have the school name and all of the children's names listed on it - but I blanked it out beneath the photograph, so in reality it's not a big expanse of pale blue beneath the picture). If you didn't want a single large photograph, the page easily fits 2 more 6"x4" photo mats in Pacific Point.

Stamps: Big Deal Alphabet (retired), Tart & Tangy
Ink: Versamark, Real Red, Old Olive, Basic Black stampin' write marker.
Card Stock: Crumb Cake, Pumpkin Pie, Basic Black, Very Vanilla, Real Red, Pacific Point, Daffodil Yellow, Newsprint DSP.
Accessories: Large Tag punch, XL Tag punch, Crimper, Round Tab XL punch, Scallop Oval XL punch, Big Shot, Timeless Type Alphabet, 3/4" circle punch, Spiral Border punch, Stampin' sponges, Word Window Punch, Corner Rounder Punch, Tombow glue, SNAIL. 

Monday, February 14, 2011

Quick Heart Treat Cup

Here's a quick Valentine treat I made a couple of weeks ago after seeing the idea on Rubber Redneck, it's a really quick and simple way to use the heart treat cups. Just fill up the treat cup with lollies (treats/candy/sweets), remove the adhesive from the treat cup and stick it down onto card stock, trim around it with scissors, add a hole with the crop-a-dile for the ribbon & adhere punched out sentiment and you're done! Fun, fast & effective.


Stamps: Teeny Tiny Sentiments
Ink: Real Red
Card Stock: Real Red & Whisper White
Accessories: 1/4" Real Red grosgrain ribbon, 3/8" white taffeta ribbon, crop-a-dile, heart to heart punch, word window punch, paper snips, Basic Rhinestones, SNAIL.

Saturday, February 12, 2011

Bliss Quilt Card

I'm so excited to finally get some time this week to play with my Sale-a-bration sets that came - yay I love freebies! Anyway I saw this weeks tutorial over on SCS was making quilt cards, so I used the Bliss sale-a-bration set and a couple of this years in colours and made this card:


Doesn't it look lovely? I really like this years Sale-a-bration sets and want them all!!!!! We'll also be making this card at a fabric themed workshop I have booked this week - hope the girls like it.

Stamps: Bliss
Ink: Concord Crush & Peach Parfait
Card stock: Concord Crush, Peach Parfait, Pear Pizzazz & DSP paper pack (Hostess level 1)
Accessories: Basic Rhinestones, Scallop oval punch, Large oval punch, petals-a-plenty embossing folder, Big Shot, paper snips, 1 1/4" square punch

Valentines Inlaid Embossing Card & other variations

Here's the card that I made to match the heart treat holder in the last post - it was CASEd from somewhere, but I've lost track of where - so if it's yours please let me know so I can credit you! Of course you don't just have to make it for Valentines - it also makes a lovely anniversary card as well.


I love the square lattice folder for this technique, it gives it a really lovely finish. Then I tried some different shaped punches and here are the results - same colour scheme.


The sentiment above & below are from the new Punch Bunch stamp set you can earn for FREE with either an order during Sale-a-bration or hosting a qualifying workshop before the 31st of March.


Stamps: Teeny Tiny Sentiments, Punch Bunch
Ink: Real Red
Card Stock: Basic Gray, Very Vanilla & Real Red
Accessories: Basic Rhinestones, 1 1/4" circle punch, 1/2" circle punch, 3/4" circle punch, scallop circle punch, Scallop square punch, Big Shot, Square Lattice embossing folder, SNAIL, Dimensionals, full heart punch, word window punch, heart to heart punch.

Thursday, February 10, 2011

Valentines treat

Want a quick little treat for those you care about? Perfect for Valentines Day, birthdays, Easter, Bonbonaires - change the colours/punch and you have a different look to the treat pouch. This template I got from Andrea Walford and we made it as part of a workshop last night along with a matching card.


The side view is this:


It has red M&Ms in the small cello bag - of course you could use any treats (lollies/candy) to fill the bag as appropriate to the occasion. I think the key is to not overfill the cellophane bag or it distorts the treat holder and makes it look appealing. The ribbon is actually 1 1/4" striped grosgrain ribbon, that I folded in half length ways and then just tied a reef knot, before finishing off with a fish tail cut to the ends to make it look pretty! 

Stamps: Teeny Tiny Sentiments
Ink: Cherry Cobbler Stamp 'n write marker
Card Stock: Love Letter DSP, Pretty in Pink 
Accessories: Full Heart punch, scoring blade, Riding Hood Red 1 1/4" striped grosgrain ribbon (retired - free in 2010 promotion), Basic Rhinestone, small cellophane bag, Sticky Strip, Heart to Heart punch
Non SU: M&Ms

Sunday, February 6, 2011

Felt Flowers

Since we've had a very long and hot summer, I've been a bit more indoors than normal and was watching some You Tube videos recently and got inspired to make some fabric flowers using the ever versatile Big Shot!


Pretty cute hey! I made the yellow one into a hair clip and the others I'm debating upon using as either a bag embellishment or on a headband. They are approximately 4" in diameter and are so easy to make - the red one I sewed entirely during my sons 30 minute swimming lesson this morning and still had time to watch him and chat to one of the other parents! They were made entirely using the Circles #2 die, 5 of the large circles, 5 of the medium circles, 3 of the small circles make the petals. An extra medium circle covers all the bits on the back and then I cut one green extra large circle for the leaves (cut an entire circle, cut in half and put back through the circle die to cut into leaf shapes - if that doesn't make sense I'll take some photos and add it to this post later). I also used a designer button for the flower centres (apart from the red flower - thats a button from my button box - I don't have the brights button collection yet!). Here's the back of the hair clip one - you can see the leaves better on this photo too.


Accessories: Big Shot, Circles #2 die, Designer buttons
Non SU: Felt, thread, needle, hair clip, scissors.

Saturday, February 5, 2011

Baby Naming Ceremony Invites

I recently got together with a friend to design some cards for a baby naming ceremony - the criteria was bright colours and a giraffe stamp - here's what we came up with:


I think it fitted the criteria - don't you? I love the Spot On roller wheel, I was a bit sad last year when one of the other dotty roller wheels retired, but you know what - I love this one too! We got the colour combination from the Colour Coach (Pumpkin Pie - creative combination) and added the extra colours from the Pumpkin Pie - getting started combination to give us the 5 colours we used.

Stamps: Animal Stories, Teeny Tiny Sentiments
Ink: Pacific Point, Pumpkin Pie, Early Expresso
Card Stock: Real Red, Daffodil Delight, Pumpkin Pie, Pacific Point, Whisper White.
Accessories: Top Note die, Big Shot, Polka Dot Textured Impressions embossing folder, corner rounder punch, paper snips, modern label punch, word window punch, Dimensionals, SNAIL, Spot On Jumbo roller wheel.

If you are ever stuck for ideas on a project or uses for a stamp set, please get in contact with me as it's always lots of fun to bounce ideas around and create things that aren't necessarily what I would normally do.